Vanilla Ice Cream

Who doesn’t love a classic vanilla ice cream? It’s smooth, creamy, and oh-so-delicious! Plus, it’s the perfect blank canvas for adding all sorts of toppings and mix-ins. Whether you’re a vanilla purist or you like to get creative, this recipe is a must-try!
Ingredients:
- 2 cups heavy cream
- 1 cup whole milk
- 3/4 cup granulated sugar
- 2 teaspoons vanilla extract
- A pinch of salt
Instructions:
- In a mixing bowl, combine the heavy cream, whole milk, sugar, vanilla extract, and salt. Whisk until the sugar has dissolved.
- Pour the mixture into your ice cream maker and churn according to the manufacturer’s instructions. This usually takes about 20-25 minutes.
- Once the ice cream reaches a soft-serve consistency, transfer it to a lidded container and freeze for at least 2 hours to firm up.
- Serve the vanilla ice cream on its own or with your favorite toppings. Enjoy!
How to prepare:
Preparing this vanilla ice cream is a breeze! Simply follow the instructions above, and you’ll have a creamy and delicious treat in no time. Just make sure to plan ahead and allow enough time for the ice cream to freeze properly to achieve that perfect scoopable consistency.
Preparation time: Varies depending on the ice cream maker, but typically around 30 minutes of active time, plus freezing time.
Servings: This recipe makes about 1 quart of vanilla ice cream, enough to serve approximately 8 people.
Nutrition Facts: Calories and other nutritional information may vary depending on the specific ingredients and quantities used. However, a typical serving of vanilla ice cream contains approximately 220 calories, 12 grams of fat, 25 grams of carbohydrates, and 3 grams of protein.
Tips:
- For an extra indulgent twist, try adding crushed cookies, chocolate chips, or caramel swirls to your vanilla ice cream during the last few minutes of churning.
- If you like a stronger vanilla flavor, you can also scrape the seeds from a vanilla bean and add them to the mixture along with the vanilla extract.
- Store any leftover ice cream in an airtight container in the freezer for up to a few weeks. Just keep in mind that homemade ice cream tends to become icier over time, so it’s best enjoyed within the first week or so.
FAQs:
Q: Can I use low-fat milk or alternative milk options in this recipe?
A: While you can experiment with different milk options, keep in mind that using low-fat or alternative milks may affect the creaminess and texture of the final ice cream. Whole milk and heavy cream are generally recommended for the best results.
Q: Do I need an ice cream maker to make this recipe?
A: Yes, an ice cream maker is necessary to churn the mixture and achieve that creamy texture. However, if you don’t have an ice cream maker, you can try alternative methods such as making a no-churn ice cream using condensed milk and whipped cream.
Q: Can I double the recipe?
A: Absolutely! This recipe can easily be doubled or halved, depending on your needs. Just make sure your ice cream maker can accommodate the larger quantity.
Now that you have the recipe for the most delicious vanilla ice cream, it’s time to unleash your inner ice cream artist and get creative with flavors and toppings. Whether you enjoy it on a sunny afternoon, as a refreshing treat on a hot summer day or as a guilty pleasure after a long day, this vanilla ice cream is sure to satisfy your cravings. So grab your ice cream maker and get churning!
Instant Quick And Healthy Banana Ice Cream (No Ice Cream Machine)

Looking for a guilt-free treat that’s quick and easy to make? This instant banana ice cream is just what you need! With just one ingredient and no ice cream machine required, it’s a healthy alternative to traditional ice cream that doesn’t sacrifice taste. Plus, it’s a great way to use up those ripe bananas sitting on your counter!
Ingredients:
- 3-4 ripe bananas
Instructions:
- Peel the bananas and slice them into coins.
- Place the banana slices in a single layer on a baking sheet lined with parchment paper.
- Freeze the banana slices for at least 2 hours or until fully frozen.
- Once the banana slices are frozen, transfer them to a food processor or blender.
- Blend the frozen banana slices until they reach a creamy, ice cream-like consistency. This may take a few minutes, and you may need to stop and scrape down the sides of the blender or processor bowl occasionally.
- Serve the banana ice cream immediately for a soft-serve texture, or transfer it to a lidded container and freeze for an additional 1-2 hours for a firmer consistency.
How to prepare:
Preparing instant banana ice cream couldn’t be easier! Simply follow the instructions above, and you’ll have a healthy and delicious treat in no time. Feel free to get creative by adding your favorite mix-ins such as chocolate chips, nuts, or a drizzle of peanut butter.
Preparation time: This recipe takes about 10 minutes of active time, plus freezing time for the banana slices.
Servings: The number of servings will depend on the size of your bananas and how much you enjoy. One banana typically serves one person.
Nutrition Facts: A serving of instant banana ice cream contains approximately 100-150 calories, depending on the size of the banana used. This guilt-free treat is also naturally fat-free and cholesterol-free.
Tips:
- For extra flavor, you can add a splash of vanilla extract, a sprinkle of cinnamon, or a drizzle of honey to the blender along with the frozen banana slices.
- If you prefer a softer texture, you can enjoy the banana ice cream immediately after blending. For a firmer consistency, transfer it to the freezer for an additional hour or two.
- This recipe is easily customizable to suit your taste preferences. Feel free to experiment with other frozen fruits, such as strawberries, mangoes, or peaches, for a variety of flavors.
FAQs:
Q: Can I use bananas that are not fully ripe?
A: While fully ripe bananas are ideal for achieving a naturally sweet and creamy ice cream, you can still use slightly underripe bananas. However, keep in mind that the taste and texture may be slightly different.
Q: Can I store leftover banana ice cream?
A: Unfortunately, this recipe is best enjoyed immediately after blending, as the ice cream tends to become quite hard when fully frozen. However, if you do have leftovers, you can let them thaw for a few minutes before enjoying, or use the thawed ice cream as a delicious base for smoothies or milkshakes.
Now that you have the secret to whipping up a quick and healthy banana ice cream, there’s no excuse not to indulge in a guilt-free dessert. Whether you enjoy it on its own or use it as a base for your favorite mix-ins, this instant banana ice cream is sure to satisfy your sweet tooth. So grab those ripe bananas and get blending!
SUNBEAM 4QT WOODEN ICE CREAM MAKER
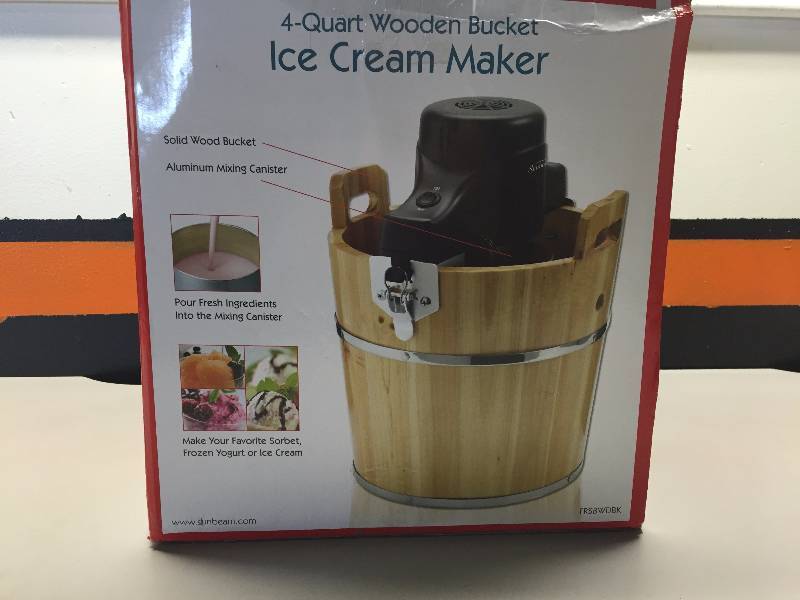
Have you ever wanted to make your own homemade ice cream but didn’t know where to start? Look no further than the Sunbeam 4Qt Wooden Ice Cream Maker! With this easy-to-use machine, you can create delicious frozen treats right in the comfort of your own home. Whether you’re a novice or a seasoned ice cream enthusiast, this ice cream maker is a game-changer!
Ingredients:
N/A
Instructions:
N/A
How to prepare:
This ice cream maker does all the hard work for you! Simply follow the instructions included with the machine to get started. The process typically involves adding your ice cream mixture to the canister, placing it inside the wooden bucket, adding ice and rock salt to the outer chamber, and turning on the machine. In about 30-40 minutes, you’ll have creamy and delicious homemade ice cream.
Preparation time: The preparation time will depend on the specific ice cream recipe and the machine’s instructions. However, most recipes take around 30-40 minutes of churning time.
Servings: The Sunbeam 4Qt Wooden Ice Cream Maker can produce about 4 quarts of ice cream, which is enough to serve approximately 16-20 people.
Nutrition Facts: As the specific recipes may vary, the nutrition facts for the ice cream produced by this machine will depend on the ingredients used. However, homemade ice cream generally contains higher-quality ingredients and fewer preservatives compared to store-bought options.
Tips:
- Make sure to read the instruction manual that comes with the ice cream maker carefully. It will include important information regarding the machine’s operation, freezing times, and maintenance.
- Before using the ice cream maker for the first time, it’s a good idea to wash all the machine’s components thoroughly. This will help ensure that your ice cream is free from any residue or contaminants.
- For the best results, make sure to chill your ice cream mixture thoroughly before adding it to the ice cream maker. This will help it freeze faster and result in a creamier texture.
FAQs:
Q: Can I use this ice cream maker to make other frozen desserts?
A: Yes, you can experiment with other frozen desserts such as sorbets or frozen yogurt using this ice cream maker. Just make sure to adjust the recipes and freezing times accordingly.
Q: How do I clean the ice cream maker?
A: After each use, make sure to unplug the machine and let it cool completely before cleaning. The canister and paddle can typically be washed with warm soapy water. Be sure to rinse them thoroughly and let them dry completely before storing. The wooden bucket should be wiped clean with a damp cloth, and the outer chamber can be emptied of any remaining ice and salt.
If you’ve always dreamed of being an ice cream connoisseur, the Sunbeam 4Qt Wooden Ice Cream Maker is a fantastic investment. It allows you to unleash your creativity in the kitchen and impress family and friends with your homemade frozen treats. So go ahead and indulge in the world of homemade ice cream with this convenient and easy-to-use machine!
Oster 4 Quart Wooden Bucket Ice Cream Maker

If you’re a fan of homemade ice cream, then the Oster 4 Quart Wooden Bucket Ice Cream Maker is a must-have appliance for your kitchen. With its vintage-inspired design and simple operation, this ice cream maker is sure to become your new favorite gadget. Whether you’re hosting a summer party or simply want to treat yourself to a refreshing dessert, this machine will help you create creamy and delicious ice cream at home.
Ingredients:
N/A
Instructions:
N/A
How to prepare:
Using the Oster 4 Quart Wooden Bucket Ice Cream Maker is a breeze! Simply follow the instructions provided with the machine. The process usually involves adding your ice cream mixture to the canister, placing it inside the wooden bucket, adding ice and rock salt to the outer chamber, and turning on the machine. In about 30-40 minutes, you’ll have smooth and creamy homemade ice cream ready to be enjoyed.
Preparation time: The preparation time will depend on the specific ice cream recipe and the machine’s instructions. However, most recipes take around 30-40 minutes of churning time.
Servings: The Oster 4 Quart Wooden Bucket Ice Cream Maker can create approximately 4 quarts of ice cream, enough to serve a crowd or stock up for later enjoyment.
Nutrition Facts: As the specific recipes may vary, the nutrition facts for the ice cream produced by this machine will depend on the ingredients used. However, homemade ice cream generally contains higher-quality ingredients and fewer preservatives compared to store-bought options.
Tips:
- Before using the ice cream maker, it’s a good idea to pre-freeze the canister for at least 24 hours. This ensures that it’s properly chilled and ready to churn your ice cream mixture.
- For the best results, make sure to use high-quality ingredients, such as fresh dairy products and real vanilla extract or other flavorings. This will greatly enhance the taste and texture of your homemade ice cream.